Generating an HTTPS Server Certificate Signing Request
If you install a certificate that is not signed by a globally known or internally trusted CA, the user's browser displays a security warning when they try to connect to the web interface.
A certificate signing request (CSR) is unique to the appliance or device from which you generated it. You cannot generate a CSR for multiple devices from a single appliance. Although all fields are optional, we recommend entering values for the following: CN, Organization, Organization Unit, City/Locality, State/Province, Country/Region, and Subject Alternative Name.
The key generated for the certificate request is in Base-64 encoded PEM format.
Procedure
| Step 1 | Choose
System ( | ||
| Step 2 | Click HTTPS Certificate. | ||
| Step 3 | Click Generate New CSR. The following figure shows an example.
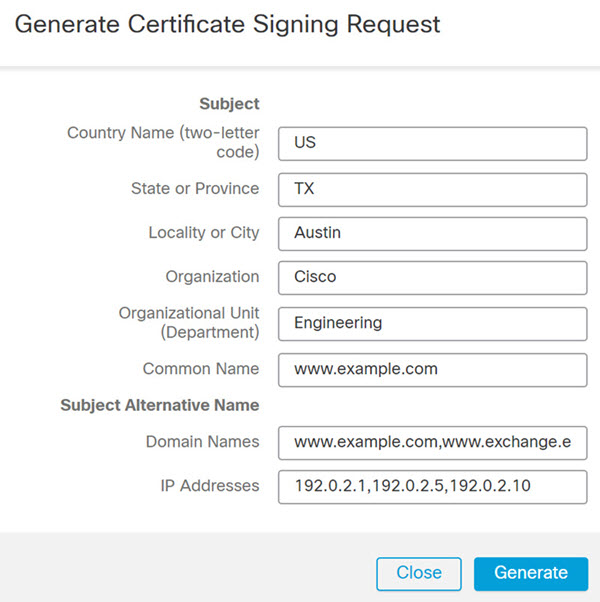 | ||
| Step 4 | Enter a country code in the Country Name (two-letter code) field. | ||
| Step 5 | Enter a state or province postal abbreviation in the State or Province field. | ||
| Step 6 | Enter a Locality or City. | ||
| Step 7 | Enter an Organization name. | ||
| Step 8 | Enter an Organizational Unit (Department) name. | ||
| Step 9 | Enter the fully qualified domain name of the server for which you want to request a certificate in the Common Name field.
| ||
| Step 10 | To request a certificate that secures multiple domain names or IP addresses, enter the folowing information in the Subject Alternative Name section:
| ||
| Step 11 | Click Generate. | ||
| Step 12 | Open a text editor. | ||
| Step 13 | Copy the entire block of text in the certificate request,
including the
| ||
| Step 14 | Save the file as
| ||
| Step 15 | Click Close. |
 )
)
What to do next
-
Submit the certificate request to the certificate authority.
-
When you receive the signed certificate, import it to the Cisco Defense Orchestrator; see Importing HTTPS Server Certificates.