Onboard an FDM-Managed HA Pair Running Threat Defense Version 6.6 or Version 6.7 and later
To onboard an FDM-managed HA pair running threat defense version 6.6 or 6.7, you must onboard the device one at a time. It does not matter if you onboard the active or standby, the primary or secondary device.
Note | If you onboard either device of an HA pair with a registration key, you must onboard the other peer device in the same method. Use the following steps for onboard an HA pair running version 6.6 or 6.7: |
Procedure
Step 1 | Onboard a peer device. See Onboard an FDM-Managed Device Running Software Version 6.6+ Using a Registration Key | ||
Step 2 | In the left pane, click . | ||
Step 3 | Click the Devices tab to locate your device. | ||
Step 4 | Click the FTD tab. Once the device is synced, select the device so it is highlighted. In the action pane located directly below Device Details, click Onboard Device. | ||
Step 5 | Enter the HA Peer Device Name for the peer device that has already been onboarded. Click Next. | ||
Step 6 | If you provided a smart license for the first device, Security Cloud Control repopulates that license so you can use it for onboarding this current device. Click Next. | ||
Step 7 | Security Cloud Control automatically generates that registration key for the device you are preparing to onboarding. Click the Copy icon | ||
Step 8 | Log into the Secure Firewall Device Manager UI of the device you want to onboard to Security Cloud Control. | ||
Step 9 | Under System Settings, click Cloud Services. | ||
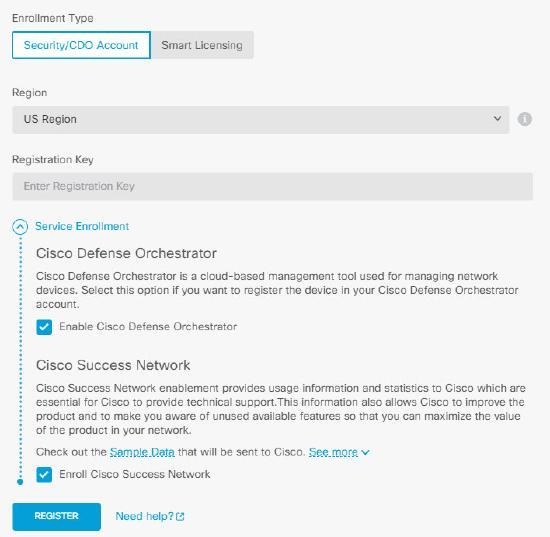
Step 10 | In the Enrollment Type area, click Security/Security Cloud Control Account.
| ||
Step 11 | In the Region field, select the Cisco cloud region that your tenant is assigned to. | ||
Step 12 | In the Registration Key field, paste the registration key that you generated in Security Cloud Control. | ||
Step 13 | For devices running version 6.7 or later in the Service Enrollment area, check Enable Firewall in Security Cloud Control. | ||
Step 14 | Review the information about the Cisco Success Network Enrollment. If you do not want to participate, uncheck the Enroll Cisco Success Network check box. | ||
Step 15 | Click Register and then Accept the Cisco Disclosure. FDM sends the registration request to Security Cloud Control. | ||
Step 16 | Return to Security Cloud Control, in the Create Registration Key area, click Next. | ||
Step 17 | In the Smart License area, you can apply a smart license to the FDM-managed device and click Nextor you can click Skip to continue the onboarding with a 90-day evaluation license or if the device is already smart-licensed. For more information, see Updating an Existing Smart License of an FDM-Managed Device.
| ||
Step 18 | Return to Security Cloud Control, click Go to Security Devices. Security Cloud Control automatically onboards the device and combines them as a single entry. Similar to the first peer device you onboard, the device status changes from "Unprovisioned" to "Locating" to "Syncing" to "Synced." |
 to copy the registration key.