Onboard the Multi-Instance Chassis Using the CLI
If you want to pre-configure your devices for multi-instance mode before you add them to the Cloud-Delivered Firewall Management Center, you can perform this procedure. To use the Cloud-Delivered Firewall Management Center to convert to multi-instance mode, see Convert a Device to Multi-Instance Mode.
You need to connect to the chassis FXOS CLI at the console port to enable multi-instance mode and perform initial setup. After you configure the chassis, you can add it to the Cloud-Delivered Firewall Management Center. The management center and the chassis share a separate management connection using the chassis MGMT interface.
Note | Although you can connect to SSH on the management port, we recommend using the console port to avoid multiple disconnections. If you use SSH before you switch to multi-instance mode, you connect to the Firewall Threat Defense CLI and need to connect to FXOS using connect fxos . This procedure covers the console port. |
Use the Cloud-Delivered Firewall Management Center to configure all chassis settings as well as instances. The Secure Firewall Chassis Manager or configuration at the FXOS CLI is not supported.
Procedure
Step 1 | Connect to the chassis console port. The console port connects to the FXOS CLI. | ||
Step 2 | Log in with the username admin and the password Admin123. The first time you log in to FXOS, you are prompted to change the password.
Example: | ||
Step 3 | Check your current mode, Native or Container. If the mode is Native, you can continue with this procedure to convert to multi-instance (Container) mode. show system detail Example: | ||
Step 4 | Enable multi-instance mode. scope system set deploymode container You are prompted to reboot. Example:To change the mode back to appliance mode, enter set deploymode native . | ||
Step 5 | After the chassis finishes rebooting, set the Management IP address. You can use IPv4 and/or IPv6. The default address is 192.168.45.45/24 with a gateway of 192.168.45.1. IPv4: scope fabric-interconnect set out-of-band static ip ip_address netmask network_mask gw gateway_ip_address IPv6: scope fabric-interconnect scope ipv6-config set out-of-band static ipv6 ipv6_address ipv6-prefix prefix_length ipv6-gw gateway_address Example:IPv4: IPv6: | ||
Step 6 | Log in to Security Cloud Control. | ||
Step 7 | In the left pane, click . | ||
Step 8 | Click Onboard device or service ( | ||
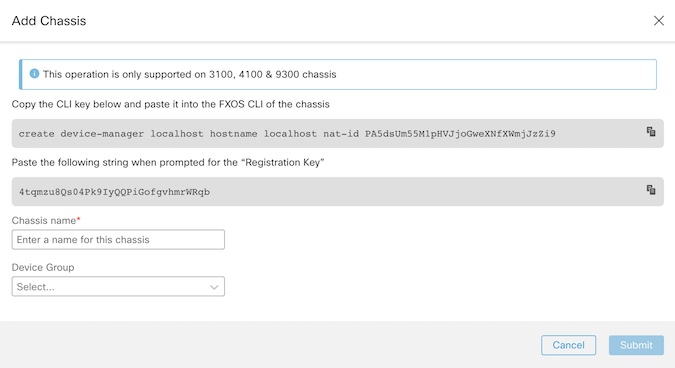
Step 9 | Click the FTD Chassis tile to open the Add Chassis dialog box. 
| ||
Step 10 | Click Copy ( | ||
Step 11 | When prompted for the Registration Key at the FXOS CLI, click Copy ( You can disconnect from the FXOS CLI at this point. | ||
Step 12 | In the Cloud-Delivered Firewall Management Center Chassis Name field, enter a name for the chassis as you want it to display in the Cloud-Delivered Firewall Management Center. | ||
Step 13 | (Optional) Add the chassis to a Device Group. | ||
Step 14 | Click Submit. The chassis is added to the page. | ||
Step 15 | To view and configure the chassis, click Manage in the
Chassis column, or click Edit ( The Chassis Manager page opens for the chassis to the Summary page. 
|
 ) icon.