How to Block Threats

You can implement next generation Intrusion Prevention System (IPS) filtering by adding intrusion policies to your access control rules. Intrusion policies analyze network traffic, comparing the traffic contents against known threats. If a connection matches a threat you are monitoring, the system drops the connection, thus preventing the attack.

All other traffic handling occurs before network traffic is examined for intrusions. By associating an intrusion policy with an access control rule, you are telling the system that before it passes traffic that matches the access control rule's conditions, you first want to inspect the traffic with an intrusion policy.

You can configure intrusion policies on rules that allow traffic only. Inspection is not performed on rules set to trust or block traffic. In addition, you can configure an intrusion policy as the default action if you do not want to use a simple block.

Besides inspecting traffic that you allow for potential intrusions, you can use the Security Intelligence policy to preemptively block all traffic to or from known bad IP addresses, or to known bad URLs.

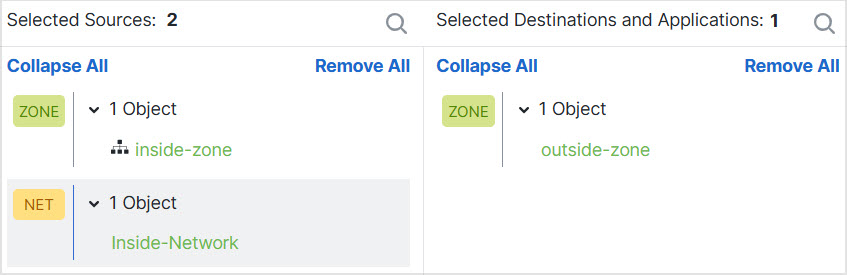
This example adds an intrusion policy that allows the internal 192.168.1.0/24 network to got outside, and assumes you already have block rules to selectively eliminate unwanted connections, while also adding a Security Intelligence policy to do pre-emptive blocking.

Before you begin

You must apply the IPS license to any managed device that uses this rule.

This example assumes you have already created security zones for inside and outside interfaces, and the network object for the inside network.

Procedure


Step 1

Create the access control rule that applies the intrusion policy.

  1. While editing the access control policy, click Add Rule.

  2. Give the rule a meaningful name, such as Inside_Outside, and ensure the rule action is Allow.


    Access rule name and action.
  3. For Intrusion Policy, select Balanced Security and Connectivity. You can either accept the default variable set or select your own if you want to customize it.

    The Balanced Security and Connectivity policy is appropriate for most networks. It provides a good intrusion defense without being overly aggressive, which has the potential of dropping traffic that you might not want to be dropped. If you determine that too much traffic is getting dropped, you can ease up on intrusion inspection by selecting the Connectivity over Security policy.

    If you need to be aggressive about security, try the Security over Connectivity policy. The Maximum Detection policy offers even more emphasis on network infrastructure security with the potential for even greater operational impact.

    If you create your own custom policy, you can select that one instead.

    A discussion of variable sets is beyond the scope of this example. Please read the chapters on intrusion policy for detailed information about variable sets and custom policies.


    Access rule intrusion policy setting.
  4. Select the Zones tab, and add your inside security zone to the source criteria, and outside zone to the destination criteria.

  5. Select the Networks tab, and add the network object that defines your inside network to the source criteria.

    The match criteria should look similar to the following:


    Access rule match criteria.
  6. Click Logging and enable logging at the beginning or end of the connection, or both, as desired.

  7. Click Apply to save the rule, and then Save to save the updated policy.

  8. Move the rule to the appropriate location in the access control policy.

Step 2

Configure the Security Intelligence policy to preemptively drop connections with known bad hosts and sites.

By using Security Intelligence to block connections with hosts or sites that are known to be threats, you save your system the time needed to do deep packet inspection to identify threats in each connection. Security Intelligence provides an early block of undesirable traffic, leaving more system time to handle the traffic you really care about.

  1. While editing the access control policy, click the Security Intelligence link in the packet path.

    The link includes two policies: the DNS policy at the top, and the Security Intelligence (Network and URL) at the bottom. In this example, we are configuring the Network and URL lists. By default, these lists already include the global block and do not block lists, but these lists are empty by default until you add items to them.

  2. With Networks selected and the Any security zone selected, scroll down in the list until you get to the global lists, and the first Security Intelligence category (probably Attackers). Click Attackers, then scroll to the end of the categories (probably Tor_exit_node), and Shift+Click to select all of the categories. Click Add To Block List.

  3. Select the URL tab, and Any security zone, and use Shift+Click to select URL versions of the same categories. Click Add To Block List.

  4. Click Save to save the policy.

  5. As necessary, you can add network and URL objects to the block or do not block lists.

    The Do Not Block lists are not real "allow" lists. They are exception lists. If an address or URL in the exception list also appears in the blocked list, the connection for the address or URL is allowed to pass on to the access control policy. This way, you can block a feed, but if you later find that a desirable address or site is being blocked, you can use the exception list to override that block without needing to remove the feed entirely. Keep in mind that these connections are subsequently evaluated by access control, and if configured, an intrusion policy. Thus, if any connections do contain threats, they can be identified and blocked during intrusion inspection.

    Use the events and dashboards to determine what traffic is actually being dropped by the policy, and whether you need to add addresses or URLs to the Do Not Block lists.

Step 3

Deploy your changes.