Configuring a pxGrid Cloud identity source (Cisco ISE 3.3 or earlier)
Before you begin, create a Cisco Account.
Important | This topic applies to Cisco ISE version 3.3 or earlier. If you are using a later version, see Configuring a pxGrid Cloud identity source instead. |
Summary
The key components involved in configuring a pxGrid Cloud identity source are:
-
Cisco ISE: Enables pxGrid Cloud for secure data exchange and provides the data source for user information
-
Catalyst Cloud Portal: Manages registration and authentication between components, creates application instances, and provides one-time passwords for secure connection
-
Cloud-Delivered Firewall Management Center: Creates and activates the identity source connection to receive user data from Cisco ISE
This process establishes a secure cloud-based connection that enables the Cloud-Delivered Firewall Management Center to receive user and group information from Cisco ISE through the pxGrid Cloud service.
Workflow
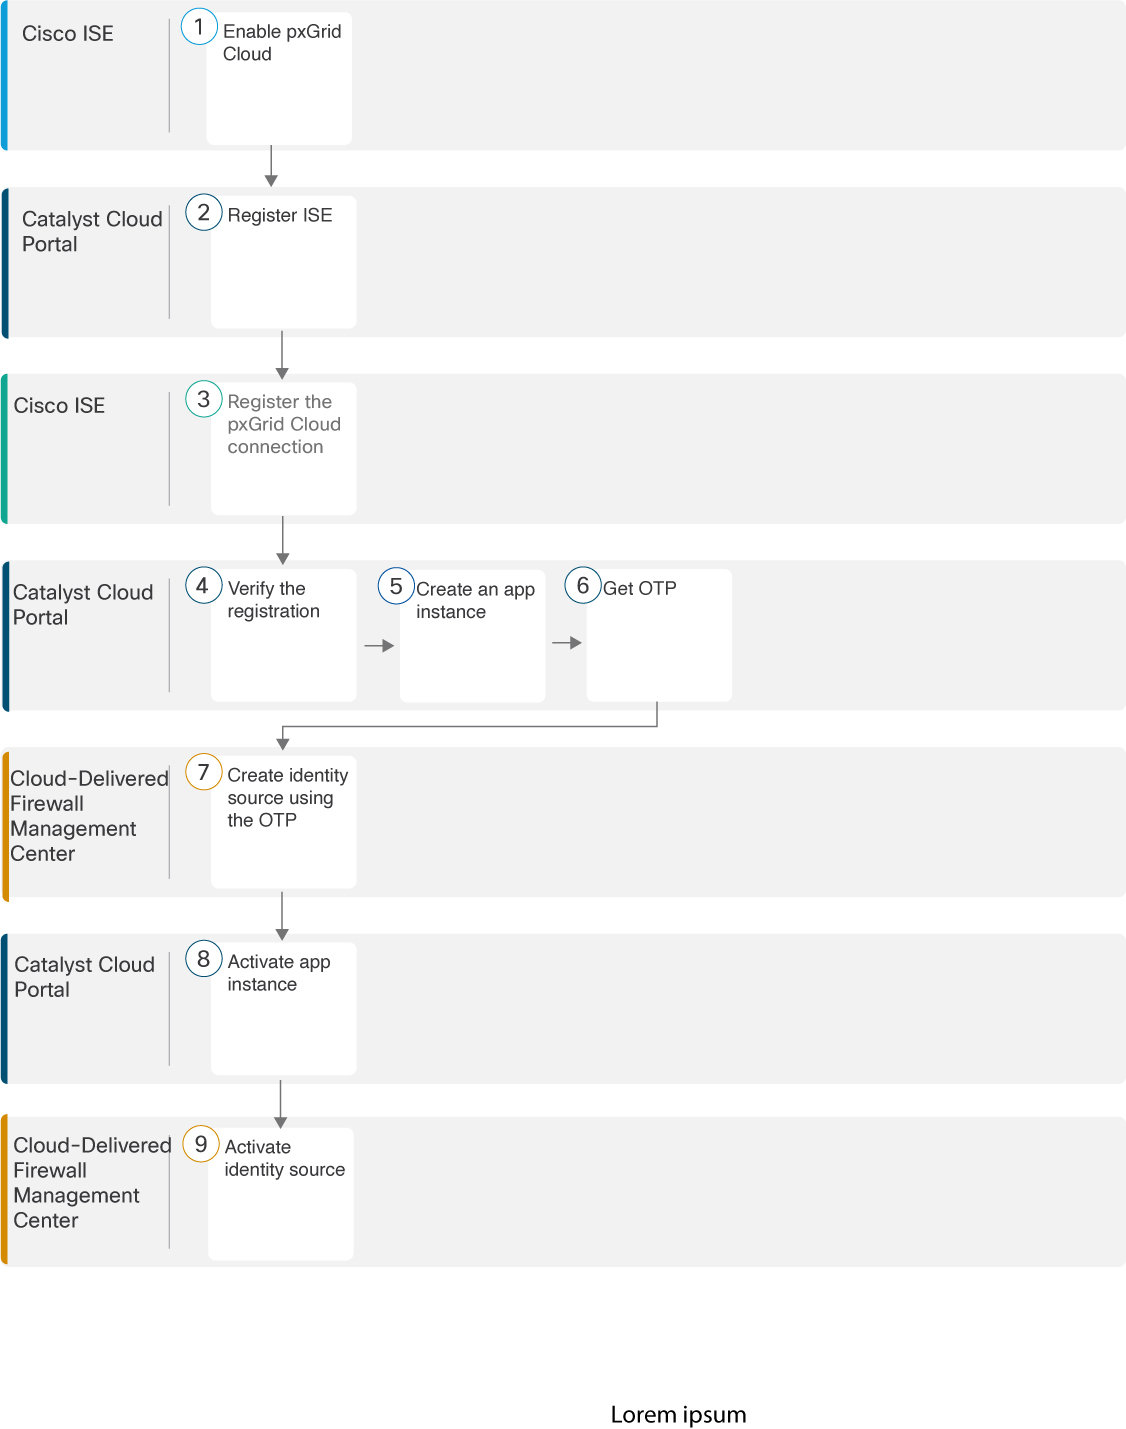
These stages describe configuring a pxGrid Cloud identity source:
-
Cisco ISE enables pxGrid Cloud functionality.
- pxGrid Cloud enables you to subscribe to offers and to register apps (in this case, the Cloud-Delivered Firewall Management Center) for secure data exchange in a cloud environment
- The administrator registers Cisco ISE in the Catalyst Cloud Portal and authenticates communication between Cisco ISE and the Catalyst Cloud Portal. For more information, see Register Cisco ISE with the Catalyst Cloud Portal.
- The administrator registers the pxGrid Cloud with Cisco ISE and verifies the registration. For more information, see Register the pxGrid Cloud connection with Cisco ISE.
-
The administrator creates an application instance in the Catalyst Cloud Portal and gets the one-time password (OTP).
- The application instance enables the Cloud-Delivered Firewall Management Center to authenticate with Cisco ISE using the pxGrid Cloud service
- The OTP, required for the next step, expires in 60 minutes
-
The administrator creates the pxGrid Cloud identity source using the OTP from the previous step.
- Linking the app enables the Cloud-Delivered Firewall Management Center to authenticate with Cisco ISE and the Catalyst Cloud Portal so it can receive user data from Cisco ISE
- The administrator activates the app instance in the Catalyst Cloud Portal. For more information, see Activate the app instance.
- The administrator activates the pxGrid Cloud identity source in the Cloud-Delivered Firewall Management Center. For more information, see Activate the pxGrid Cloud identity source
What’s next
After you have completed all the preceding tasks, you can:
-
Test the pxGrid Cloud identity source to make sure it's working properly. For more information, see Test the pxGrid Cloud identity source.
-
Create dynamic attributes filters, which define what dynamic objects are sent to the Cloud-Delivered Firewall Management Center. For more information, see Create dynamic attributes filters.
-
After you configure the pxGrid Cloud identity source, you can use dynamic objects, Microsoft AD user and groups, and Azure AD users and groups in access control rules.