Configure the Captive Portal Part 2: Create an Identity Policy and Active Authentication Rule

Before you begin

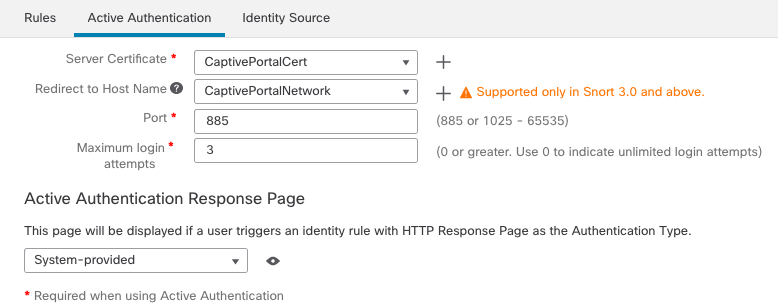
This multi-part procedure shows how to set up the captive portal using the default TCP port 885 and using a management center server certificate for both the captive portal and for TLS/SSL decryption. Each part of this example explains one task required to enable the captive portal to perform active authentication.

If you follow all the steps in this procedure, you can configure captive portal to work for users in your domains. You can optionally perform additional tasks, which are discussed in each part of the procedure.

For an overview of the entire procedure, see How to Configure the Captive Portal for User Control.

Procedure


Step 1

Log in to the management center if you have not already done so.

Step 2

Click Policies > Access Control > Identity and create or edit an identity policy.

Step 3

(Optional.) Click Add Category to add a category for the captive portal identity rules and enter a Name for the category.

Step 4

Click the Active Authentication tab.

Step 5

Choose the appropriate Server Certificate from the list or click Add (add icon) to add a certificate.

Note

Captive portal does not support the use of Digital Signature Algorithm (DSA) or Elliptic Curve Digital Signature Algorithm (ECDSA) certificates.

Step 6

From the Redirect to Host Name field, click the network object you previously created or click Add (add icon).

Step 7

Enter 885 in the Port field and specify the Maximum login attempts.

Step 8

Uncheck Share active authentication across firewalls to enable the management center to require users to reauthenticate every time they access your network using a different managed device than the last time.

For more information about this option, see Captive Portal Fields.

Step 9

(Optional.) Choose an Active Authentication Response Page as described in Captive Portal Fields.

Step 10

(If you upgraded to version 7.4.1 from an earlier version only and you authenticate users with a realm sequence.) Click Edit (edit icon) and see Update a Custom Authentication Form.

Step 11

Click Save.

Step 12

Click Rules.

Step 13

Click Add Rule to add a new captive portal identity policy rule, or click Edit (edit icon) to edit an existing rule.

Step 14

Enter a Name for the rule.

Step 15

From the Action list, choose Active Authentication.

Step 16

Click Realm & Settings.

Step 17

From the Realms list, choose a realm or realm sequence to use for user authentication.

Step 18

(Optional.) Check Identify as Guest if authentication cannot identify user. For more information, see Captive Portal Fields.

Step 19

Choose an Authentication Protocol from the list.

You cannot authenticate users with a realm sequence if you choose NTLM, Kerberos, or HTTP Negotiate authentication protocols. Choose HTTP Basic or HTTP Response Page instead.

Step 20

(Optional.) To exempt specific application traffic from captive portal, see Exclude Applications from Captive Portal.

Step 21

Add conditions to the rule (port, network, and so on) as discussed in Identity Rule Conditions.

Step 22

Click Add.

Step 23

At the top of the page, click Save.


What to do next

Continue with Configure the Captive Portal Part 3: Create a TCP Port Access Control Rule.