|
Cluster Configuration
|
|
|
|
ClusterGrpNamePrefix
|
String
|
This is the cluster name Prefix. The cluster number will be added as a suffix.
|
|
ClusterNumber
|
String
|
This is the cluster number. This will be suffixed to the cluster name (msa-ftdv-infra). For example, if this value is 1, the group name will be msa-ftdv-infra-1. It should be at least 1 digit, but not more than 3 digits. Default: 1. |
|
ClusterSize
|
Numbers
|
This is the total number of Firewall Threat Defense
Virtual nodes in a cluster.
Minimum: 1
Maximum:16
|
|
Infrastructure Details
|
|
|
|
NoOfAZs
|
String
|
This is the total number of availability zones into which Firewall Threat Defense
Virtual is deployed. (The number of availability zones varies from a Minimum 1 to Maximum 3 depending on a region).
The subnet will be created in these availability zones.
The availability zones available in this list is based on the region selected for deploying the cluster.
Note |
Management, Inside, and Cluster Control Link (CCL) subnets are created across three availability zones based on this parameters.
|
|
|
AZ
|
String
|
The availability zone list is based on the region you plan to deploy. In Availability Zone list, select the valid availability zone (1 availability zone or 2 availability zones or 3 availability zones). Count should match with the value of Number of Availability Zones parameter. |
|
NotifyEmailID
|
String
|
Email address to which cluster events email will be sent. You must accept a subscription email request to receive this email notification. Example: admin@company.com |
|
VpcId
|
String
|
The VPC ID for the cluster group.
Type: AWS::EC2::VPC::Id
|
|
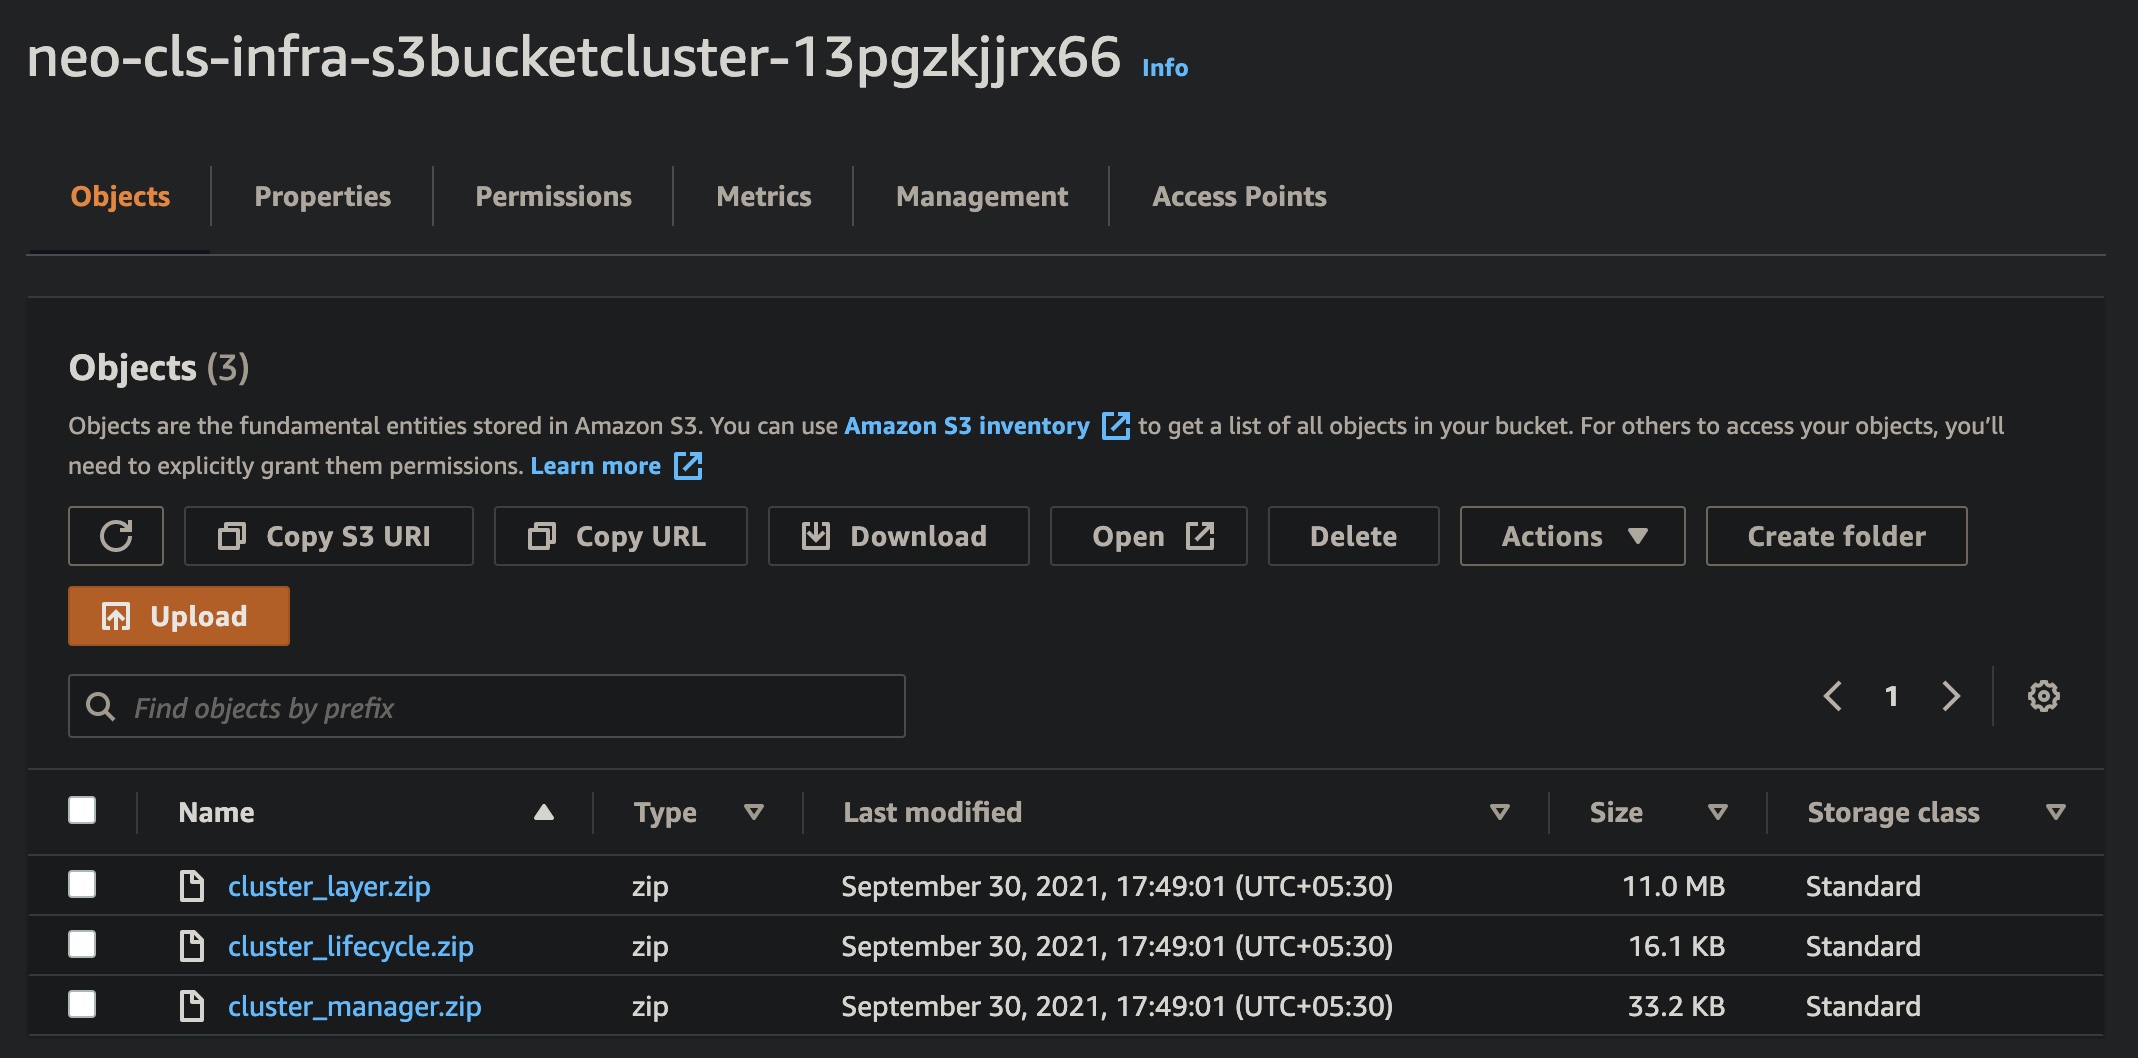
S3BktName
|
String
|
The S3 Bucket that contains the uploaded Lambda zip files. You must specify correct bucket name.
|
|
MgmtSubnetIds
|
List
|
Enter only one subnet per availability zone.
If you select multiple subnets from a same availability zone, then selecting an incorrect subnet may cause issues while deploying the Firewall Threat Defense
Virtual instances.
Type: List<AWS::EC2::Subnet::Id>
|
|
InsideSubnetIds
|
List
|
Enter at least one subnet per availability zone.
If multiple subnets from the same Availability Zone are selected, then selecting an incorrect subnet may cause issues while deploying the Firewall Threat Defense
Virtual instances.
Type: List<AWS::EC2::Subnet::Id>
|
|
LambdaSubnets
|
List
|
Enter at least two subnet for the Lambda functions. The two subnets you enter must have a NAT gateway to enable the Lambda functions to communicate with AWS services, which are public DNS.
Type: List<AWS::EC2::Subnet::Id>
|
|
CCLSubnetIds
|
String
|
Enter at least one subnet per availability zone.
If multiple subnets from the same Availability Zone are selected, then selecting an incorrect subnet may cause issues while deploying the Firewall Threat Defense
Virtual instances.
Type: List<AWS::EC2::Subnet::Id>
|
|
CCLSubnetRanges
|
String
|
Enter IP addresses range of CCL subnets for different availability zones.
Exclude first 4 reserved IP addresses. IP address pool for Cluster Control Link (CCL).
IP address is allocated to the CCL interfaces of the Firewall Threat Defense
Virtual instance from CCL IP address pool.
|
|
MgmtInterfaceSG
|
List
|
Select security group ID for the Firewall Threat Defense
Virtual instances.
Type: List<AWS::EC2::SecurityGroup::Id>
|
|
InsideInterfaceSG
|
List
|
Select security group ID for the inside interface of Firewall Threat Defense
Virtual instances.
Type: List<AWS::EC2::SecurityGroup::Id>
|
|
LambdaSG
|
List
|
Select a security group for the Lambda functions.
Ensure outbound connections is set to ANYWHERE.
Type: List<AWS::EC2::SecurityGroup::Id>
|
|
CCLInterfaceSG
|
List
|
Select a security group ID for CCL interface of the Firewall Threat Defense
Virtual instances.
|
|
GWLB Configuration
|
|
|
|
DeployGWLBE
|
String
|
Click Yes to deploy the GWLB endpoint. By default, the value is set to No. |
|
VpcIdLBE
|
String
|
Enter VPC to deploy Gateway Load Balancer Endpoint.
Note |
Do not enter any value in this field if you are not deploying the GWLB endpoint.
|
|
|
GWLBESubnetId
|
String
|
Enter only one subnet ID.
Note |
Do not enter any value in this field if you are not deploying the GWLB endpoint.
|
Ensure that the subnet belongs to the correct VPC, and the availability zones that you have specified.
|
|
TargetFailover
|
String
|
Enable Target Failover support when a target fails or deregisters. (By default, the value of this parameter is set to rebalance).
-
no_rebalance: Directs existing flows to failed targets and new flows to healthy targets, ensuring backward compatibility.
-
rebalance: Redistributes existing flows while ensuring that new flows go to healthy targets.
rebalance is supported from Firewall Threat Defense
Virtual Version 7.4.1 and later.
|
|
TgHealthPort
|
String
|
Enter Health Check Port for GWLB.
Note |
By default, this port must not be used for traffic.
|
Ensure the value you provide is a valid TCP port. Default: 8080
|
|
Cisco NGFWv Instance Configuration
|
|
|
|
InstanceType
|
String
|
Cisco Firewall Threat Defense
Virtual EC2 instance type. Ensure that the AWS Region supports Instance Type you select. By default, c5.xlarge is selected. |
|
LicenseType
|
String
|
Choose Cisco Firewall Threat Defense
Virtual EC2 instance license type. Ensure that the AMI ID that you enter in AMI-ID parameter is of the same licensing type. By default, BYOL is selected. |
|
AssignPublicIP
|
String
|
Set the value as true to assign a public IP address for Firewall Threat Defense
Virtual from the AWS IP address pool.
|
|
AmiID
|
String
|
Choose the correct AMI ID as per the region, version, and license type (BYOL or PAYG).
Firewall Threat Defense
Virtual 7.2 and later support clustering, and Firewall Threat Defense
Virtual Version 7.6 and later support the autoscaling and multiple availability zone enhancements.
Type: AWS::EC2::Image::Id
|
|
ngfwPassword
|
String
|
Firewall Threat Defense
Virtual instance password. All Firewall Threat Defense
Virtual instances come up with a default password, which is in the Userdata field of the Launch Template (Cluster Group). The password is activated after Firewall Threat Defense
Virtual is accessible. Minimum length must be 8 characters. The password can either be a plain text password or a KMS encrypted password. |
|
KmsArn
|
String
|
Enter ARN of an existing KMS (AWS KMS key to encrypt at rest).
If you specify a value in this field, then the Firewall Threat Defense
Virtual instance's admin password must be an encrypted password.
Example of generating an encrypted password: "aws kms encrypt --key-id <KMS ARN> --plaintext <password> "
The password encryption must be done using only the specified ARN.
|
|
FMC Automation Configuration
|
|
|
|
fmcDeviceGrpName
|
String
|
Enter a unique name for the cluster group in management center.
|
|
fmcPublishMetrics
|
String
|
Select true to create a Lambda Function to poll management center and publish specific device group metrics to AWS CloudWatch.
Allowed values:
By default, the value is set to true.
|
|
fmcMetricsUsername
|
String
|
Enter a unique internal user name for polling memory metrics from management center.
The user must have privileges of Network Admin and Maintenance User or more .
|
|
fmcMetricsPassword
|
String
|
Enter the password.
If you have mentioned KMS Master Key ARN parameter, ensure to provide an encrypted password.
Ensure to enter the correct password because entering incorrect password may result in failure of metrics collection.
|
|
fmcServer
|
String
|
The IP address can be an external IP address or the IP address reachable in Firewall Threat Defense
Virtual management subnet in the VPC.
Minimum length: 7
Maximum length:15
|
|
fmcOperationsUsername
|
String
|
Provide a unique internal user name for Firewall Management Center
Virtual for CloudWatch.
The user must have Administrator privileges.
|
|
fmcOperationsPassword
|
String
|
Enter the password.
If you have mentioned KMS Master Key ARN parameter, ensure to provide an encrypted password.
|
|
Scaling Configuration
|
|
|
|
CpuThresholds
|
CommaDelimitedList
|
(Optional) Specifying non-zero lower and upper thresholds will create scale policies. If (0,0) is selected, no CPU scaling alarm or policies will be created. Evaluation points and data points are at default or recommended values.
By default, Autoscale is enabled in this template. Autoscale can be disabled after deployment.
|
|
MemoryThresholds
|
CommaDelimitedList
|
Specifying non-zero lower and upper threshold will create scale policies. If (0,0) is selected, no memory scaling alarm or policies will be created. Evaluation points and data points are at default or recommended values.
|