Deploy a Secure Device Connector Using Security Cloud Control's VM Image
When using device credentials to connect Security Cloud Control to a device, it is a best practice to download and deploy an SDC in your network to manage the communication between Security Cloud Control and the device. Typically, these devices are non-perimeter based, do not have a public IP address, or have an open port to the outside interface. Adaptive Security Appliances (ASAs), FDM-managed devices, Firepower Management Centers (FMCs), and SSH and IOS devices, can all be onboarded to Security Cloud Control using an SDC.
The SDC monitors Security Cloud Control for commands that need to be executed on your managed devices, and messages that need to be sent to your managed devices. The SDC executes the commands on behalf of Security Cloud Control, sends messages to Security Cloud Control on behalf of the managed devices, and returns replies from the managed devices to Security Cloud Control.
The number of devices a single SDC can manage depends on the features implemented on those devices and the size of their configuration files. For the purposes of planning your deployment, however, we expect one SDC to support approximately 500 devices. See Using Multiple SDCs on a Single Security Cloud Control Tenant for more information.
This procedure describes how to install an SDC in your network, using Security Cloud Control's VM image. This is the preferred, easiest, and most reliable way to create an SDC.
Before you begin
Review these prerequisites before you deploy the SDC:
-
Security Cloud Control requires strict certificate checking and does not support Web/Content Proxy inspection between the Secure Device Connector (SDC) and the Internet. If using a proxy server, disable inspection for traffic between the SDC and Security Cloud Control.
-
The SDC must have full outbound access to the internet on TCP port 443, or the port you have configured for device management. The devices managed by Security Cloud Control must also allow inbound traffic from this port.
-
Review Connect Cisco Security Cloud Control to the Secure Device Connector to ensure proper network access.
-
Security Cloud Control supports installing its SDC VM OVF image using the vSphere web client or the ESXi web client.
-
Security Cloud Control does not support installing the SDC VM OVF image using the vSphere desktop client.
-
ESXi 5.1 hypervisor.
-
Cent OS 7 guest operating system.
-
System requirements for a VMware ESXi host with only one SDC:
-
VMware ESXi host needs 2 CPU.
-
VMware ESXi host needs a minimum of 2 GB of memory.
-
VMware ESXi requires 64 GB disk space to support the virtual machine depending on your provisioning choice.
-
-
System requirements for a VM with an SDC and a single Secure Event Connector (SEC) for your tenant. (The SEC is a component used in Cisco Security Analytics and Logging).
Each SEC that you add to the VMware ESXi host requires an additional 4 CPUs and an additional 8 GB of memory.
Therefore, these are the requirements for a VMware ESXi host with one SDC and one SEC:
-
VMware ESXi host needs 6 CPU.
-
VMware ESXi host needs a minimum of 10 GB of memory.
-
VMware ESXi requires 64 GB disk space to support the virtual machine depending on your provisioning choice.
-
-
The dockers IP must be in a different subnet than the SDC's IP range and the device IP range.
-
Gather this information before you begin the installation:
-
Static IP address you want to use for your SDC.
-
Passwords for the
rootandcdousers that you create during the installation process. -
The IP address of the DNS server your organization uses.
-
The gateway IP address of the network the SDC address is on.
-
The FQDN or IP address of your time server.
-
-
The SDC virtual machine is configured to install security patches on a regular basis and in order to do this, opening port 80 outbound is required.
Procedure
Step 1 | Log on to the Security Cloud Control Tenant you are creating the SDC for. | ||
Step 2 | In the left pane, click . | ||
Step 3 | On the Services page, select the Secure Connectors tab, click the blue plus button, and select Secure Device Connector. | ||
Step 4 | In Step 1, click Download the SDC VM image. This opens in a separate tab. 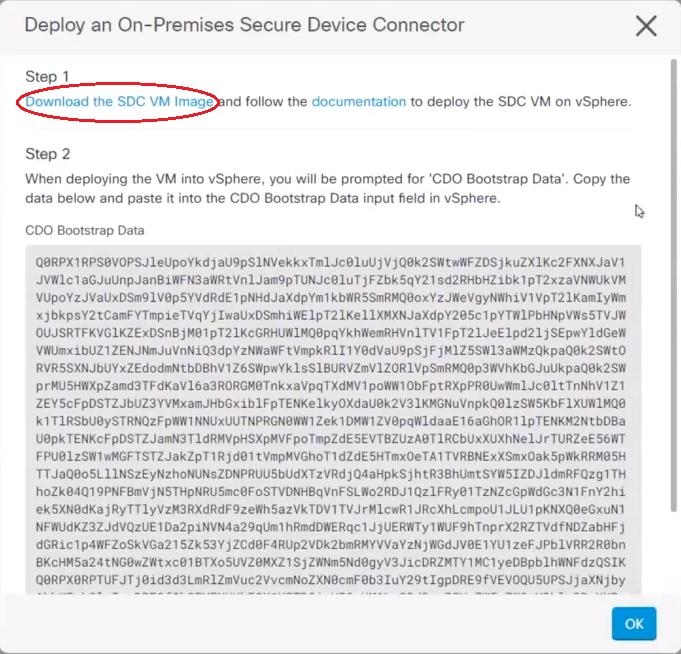
| ||
Step 5 | Extract all the files from the .zip file. They will look similar to these:
| ||
Step 6 | Log on to your VMware server as an administrator using the vSphere Web Client.
| ||
Step 7 | Deploy the Secure Device Connector virtual machine from the OVF template by following the prompts. | ||
Step 8 | When the setup is complete, power on the SDC VM. | ||
Step 9 | Open the console for your new SDC VM. | ||
Step 10 | Login with the username "CDO". The default password is adm123. | ||
Step 11 | At the prompt, type | ||
Step 12 | When prompted for the password, enter | ||
Step 13 | Follow the prompts to create a new password for user | ||
Step 14 | Follow the prompts to create a new password for the Security Cloud Control user. Enter your password for the user | ||
Step 15 | When prompted with Please choose the Security Cloud Control domain you connect to, enter your Security Cloud Control domain information. | ||
Step 16 | Enter the following domain information of the SDC VM when prompted: | ||
Step 17 | When prompted with Are these values correct? (y/n), confirm your entries with y. | ||
Step 18 | Confirm your entries. | ||
Step 19 | When prompted with Would you like to setup the SDC now? (y/n), enter
| ||
Step 20 | The VM console automatically logs you out. | ||
Step 21 | Create an SSH connection to the SDC. Login as: CDO and enter your password. | ||
Step 22 | At the prompt, type | ||
Step 23 | When prompted with [sudo] password, enter the password you created in step 14. | ||
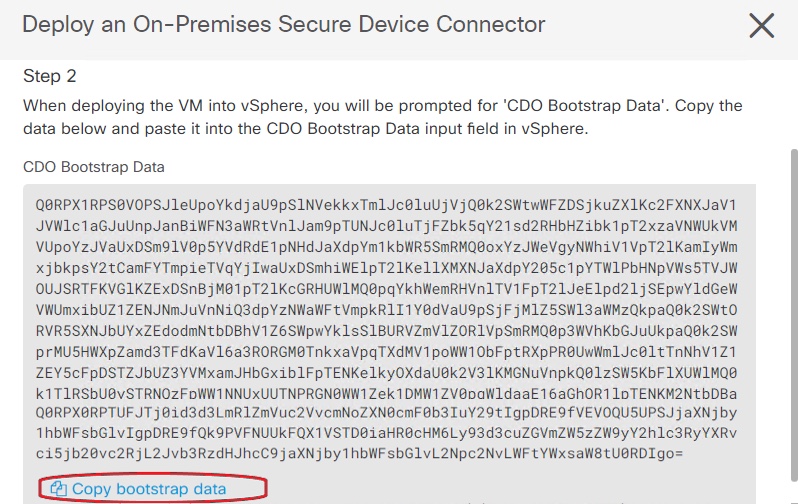
Step 24 | When prompted with Please copy the bootstrap data from the Secure Connector Page of Security Cloud Control, follow this procedure:
| ||
Step 25 | When prompted with Do you want to update these setting? (y/n), enter
| ||
Step 26 | Return to the Secure Device Connector page. Refresh the screen until you see the status of your new SDC change to Active. |